 Long before I developed an addiction to brötchen, ciabatta was my bread of choice. With its elongated, dimpled, grotesque appearance, ciabatta is the Ernest Borgnine of the bread world. However, what it lacks in appearance, it makes up for in taste. Ciabatta possesses a light, airy interior with Swiss cheese like holes that I love.
I worked hard to learn this bread. With a keen sense of anticipation, week after week I'd slice into my loaves, and week after week, I encountered a dense crumb. I failed with this bread because I applied the bread baking paradigm of my youth to this bread. I kept insisting on creating a firm dough that could be kneaded and shaped by hand. However, ciabatta requires a wet dough that demands a mixer to adequately knead it.
I learned this when I read the following excerpt from Daniel Leader's Local Breads:
Water, and lots of it, is the key ingredient in ciabatta. Water hydrates the starches that gelatinize and swell into glossy air pockets that distinguish this bread from other Italian loaves. Water also makes the dough extremely sticky and more challenging to handle than traditional bread dough, so use a mixer instead of kneading by hand. The dough takes longer to rise, which is why the fermentation time for this bread is longer than for any other bread . . . It's during the slow rise that ciabatta develops its porous structure. Light steam gives the bread its characteristic soft crust, which makes ciabatta so perfect for sandwiches.
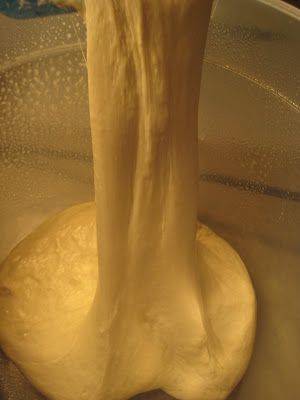
 (This is a picture of the dough after it's been kneaded)
- It's a wet dough that demands a mixer to effectively knead it.
- Give it adequate time to proof.
- Before you place the bread in the oven, you need to create some steam, so that the loaves will spring. This step is crucial.
- Don't worry about getting the bread perfectly shaped. Embrace its rustic appearance.
Ciabatta
Adapted from Daniel Leader's Local Breads
 (The crumb of the bread in this picture has a pale appearance because I just pulled the bread from my freezer,; therefore it's a bit a bit frozen)
Biga Ingredients (A biga is similar to a sourdough starter; however, it doesn't contain as much water)Adapted from Daniel Leader's Local Breads
 (The crumb of the bread in this picture has a pale appearance because I just pulled the bread from my freezer,; therefore it's a bit a bit frozen)
- 1/3 cup of water
- 1/2 teaspoon instant yeast
- 2/3 cup unbleached bread flour
- Nine to 17 hours before you want to bake, prepare the biga. Simply pour the water into a small mixing bowl, and with a rubber spatula stir in the yeast and flour until a stiff dough forms.
- Dust the counter with flour and scrape out the dough. Knead the dough for a couple of minutes just to work in all the flour and get it fairly smooth. At this point you should have about a plum-size ball of dough.
- Lightly oil the mixing bowl, and place the biga in the bowl. Cover the bowl with plastic wrap, and leave at room temperature for 1 hour or so. Then refrigerate it for at least 8 and up to 16 hours. The biga will double and become somewhat bubbly.
Bread Dough Ingredients
- Biga from the above recipe
- 1 3/4 cups water
- 2 teaspoons instant yeast
- 3 1/4 cups unbleached bread flour
- 1 1/2 teaspoons kosher salt
- Remove the biga from the refrigerator, and scrape it into the mixing bowl. Pour the water over the big and stir it with a spatula to soften it and break it into clumps. Stir in the yeast, flour, and salt until a dough forms.
- With the dough hook, mix the dough on medium-high speed (8 on a KitchenAid mixer) for 13 to 15 minutes. Keep an eye on the mixer because it might shimmy off the counter. At first the dough will be very soupy and it will not clear the side of the bowl, but gradually the dough will develop beautiful strands of gluten and begin to climb up the dough hook. Periodically stop the machine and scrape down the hook and the sides of the bowl with a rubber spatula. After 13-15 minutes, turn the machine to high speed and knead until the dough becomes more coherent, clears the sides of the bowl, and collects around the hook. This should take about 2 to 3 minutes, and when you're done, the dough will glisten. Think: Ashley Judd in the movie A Time to Kill, or if you prefer, the forehead of a 1970's Vegas Elvis wearing a jewel-encrusted jumpsuit. The dough will look creamy and will be very elastic.
- Transfer the dough to a lightly oiled, clear 2-quart container and cover it with plastic wrap. Let the dough rise at room temperature until it triples in size. This will take 3 to 4 hours. The dough will be lively, bubbly, and you'll be able to pull away long, stretchy strands.
- Cover a baker's peel or rimless baking sheet with parchment paper, and dust the paper with flour. Uncover the dough and turn it out onto a heavily floured countertop. With a bench scraper or pizza cutter, cut the dough into 2 equal piece (19.6 ounces each). Generously dust your hands with flour because this will prevent the dough from sticking to your hands. Pick up one piece of dough, holding one end in each hand. In one fluid motion, lift and stretch the dough and place it on one half the parchment paper. You'll have a rectangle measuring about 11 inches by 4 inches. Repeat with the other piece.
- Take your fingertips and gently dimple the surface of the bread. Drape the loaves with a tea towel or plastic wrap.Let the loaves rise at room temperature until you see bubbles under the surface of the bread. This will take 45 - 60 minutes.
- About 1 hour before baking, place a baking stone on the middle oven rack and place a cast-iron skillet or cake pan on the lower rack. Heat the oven to 475 degrees.
- Uncover the loaves. Slide the loaves, still on the parchment paper, onto the baking stone. Place 1/2 cup of ice cubes in the skillet to produce steam. Bake until the loaves are light golden crusted, 25 to 35 minutes.
- Remove the bread from the oven, and allow the loaves to cool on a wire rack.


A Twist: Ciabatta Rolls
To make this recipe into rolls, pour the dough onto a flour-dusted counter, and gently shape it into a 10-by-12-inch rectangle. Dust the top of the dough with flour. Using a pizza wheel, cut the rectangle lengthwise into 2-inch-wide strips. Cut each strip into 3-inch pieces. You should have 20 pieces of dough. Move the dough to a parchment-covered baking sheet or peel. Let the dough pieces rest until they rise and resemble little pillows. This should take 45 - 60 minutes. Bake at 475 degrees until light golden brown, about 20 minutes. I tried this once, but I lack the grace to skillfully and patiently work with 20 pieces of dough. I ended up with a mess that could never be considered rustic.


8 comments:
Oh how I love to bake bread. I can hardly wait to make ciabatta. I am thinking I can do it with your great instructions. As soon as the holidays are over, I hope to bake some good bread. I will let you know how it turns out. Thank you so much!
How I love ceabatta. It is one of my favorite breads to make. Like you I love the holes and the rusticness about it. Yummmmmm. Now I am goin' to have to make some, see what you've done!
That looks really yummy and sounds pretty easy. I'm easily intimidated by bread making, but I may have to give this a try!
Fantastic! I love the holes too! I will definitely try this.
I've never made ciabatta, but I've decided it's time to try. Looks great!
Looks absolutely fantastic. It is so hard to get those wonderful pockets of air in there but looks like you managed it. Muchos kudos to you!
I appreciate the kind comments from y'all. If you give ciabatta a shot, let me know how it turns out. I'm hoping I gave decent instructions.
take care,
muddywaters
Thanks Muddy
Best ciabatta recipe I've tried.
I come from Tasmania... an island of the worlds best produce (but not to many bakers!!!)
I'm a photographer (food, books, commercial) so i'll send a photo of my finished product.
Cheers for Now!
Nick Osborne
www.osborneimages.com
Post a Comment