Showing posts with label Bread. Show all posts

Monday, June 7, 2010

Matzo Ain't Nothing But a Cracker


Over at The 12th Man Training Table, they used a Mark Bittman recipe to make crackers. This reminded me that I have a man crush on Mr. Bittman, and this inspired me to list my top-five man crushes in the comments of that post. Crushes often lead to irrational actions.

Are these crackers worth making? I guess, it's OK to allow Keebler to do my cracker baking. However, I do like the idea of knowing what's going into my food. It's also nice to get in touch with the craft of creating something so simple. There's art in small things like making a cracker, and I'm better off baking crackers than trying to recreate the Sistine Chapel ceiling in my garage using dryer lint as my medium. Although there's value in doing that too.

Anyway I was also reminded of Mr. Bittman's recipe for Olive Oil Matzo, which I tried this spring, so consider this post spring cleaning.


What small thing do you do well?

keep it crunchy,
muddy

Tuesday, March 23, 2010

Genzano Country Bread

Over at the 12th Man Training Table, they tell me that, "One good knife can substitute for 90% of the gadgets at Williams-Sonoma." I agree with this statement. However, there are a few modern luxuries, such as the KitchenAid mixer, that I find essential.

Sure, I could knead my bread by hand. It's much more therapeutic and satisfying kickin' it old school, but the KitchenAid broadens the range of breads I can bake. There are some breads that consist of such a wet dough that they can't be kneaded by hand. The Genzano country bread from Daniel Leader's book Local Breads is an example one such bread.

At first glance, this bread appears intimidating and time consuming, but it's worth baking for the following reasons:

  1. The bread possesses a hearty, crunchy crust that is great for dunking in a soup.
  2. The interior of the bread is moist and velvetty.
  3. Its rustic appearance is unrivaled by any bread I've made.
  4. Its gargantuan size inspires awe, and its shape resembles curling stone
  5. This bread alone justifies purchasing a Kitchen Aid Stand Mixer.

Biga
  • 2/3 cup water
  • 1 2/3 cups bread flour
  • 1 teaspoon instant yeast
First you'll make a biga, which is a pre-ferment often used in Italian baking. I don't really possess the knowledge to explain what a biga is exactly. The experts say a biga adds more depth and complexity to a bread and helps preserve it. I just view it as a starter or the first step in baking some breads.

In Mr. Leader's book, he calls for using a sourdough starter in the above biga. Since I lack the discipline and committment to maintain a sourdough culture, I've adapted the recipe.

Recently I read on the actor Jorge Garcia's blog that he's been taking his sourdough starter to the set of Lost, so that he can feed it and stir it. This behavior is worth emulating.

Prepare the biga by doing the following:

  1. Place all the above ingredients in the stand mixer bowl and stir until a dough forms. Turn the dough out onto a floured countertop and knead to blend the ingredients.


  2. Place the dough back in the bowls and cover with plastic wrap. Allow to stand at room temperature for 8 to 12 hours.
Dough
  • 1 3/4 cups water
  • 3 1/4 cups flour
  • 2 teaspoons kosher salt
  • 1/2 teaspoon instant yeast
  • 1/4 cup bran for sprinkling
  1. Uncover the biga and pour the water over it. Stir with a wooden spoon to break it up. Add flour, yeast, and salt until a very wet dough forms.


  2. Use the dough hook and mix the dough on medium-high (5 or 6 on a Kitchen Aid mixer) for ten minutes. Since the mixer may "shimmy" off the counter, be sure you supervise it. I use this supervision time to sing show tunes and choreograph dance routines. The dough will not clear the sides of the bowl and will climb up the dough hook. You might have to stop the machine and scrape down the hook with a rubber spatula.


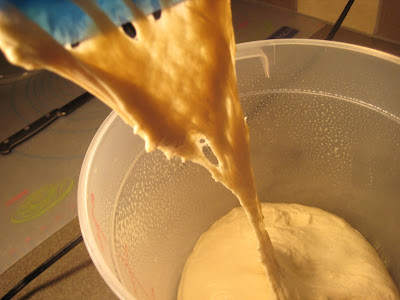
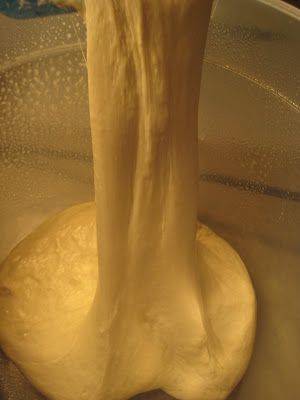
  3. Increase the speed to high (10, or 11 if you have a This a Spinal Tap mixer) and knead for 8 to 10 minutes or more. The dough will begin to pull away from the sides of the bowl, and you'll see beautiful strands of gluten developing. Give the dough a window pane test to judge its readiness.


  4. Transfer the dough to a oiled, clear 2-quart container. Cover and allow it to rise until doubled. This should take about 1 1/2 hours. After the first rise, uncover and deflate. Then cover and allow it to rise again for 1 1/2 hours.


  5. Generously coat a banneton or colander lined with a kitchen towel with bran. Lightly dust the counter with flour. Uncover the dough and turn it onto the counter. Gently shape the dough to a round. Place it into the banneton or calendar smooth side down. Coat the loaf with more bran and over with plastic wrap. Allow the round to rise and double in size, 1 1/2 hours.


  6. About 1 hour before baking, place a baking stone on a middle rack of the oven and a cast-iron skillet on the lower rack. Heat the oven to 450 degrees.


  7. Cover a baker's peel or rimless baking sheet with parchment paper. Sprinkle the parchment with bran. Uncover the loaf and gently tip it out of the banneton or bowl. Slide the loaf, still on the parchment, onto the baking stone. Place 1/4 cup of ice cubes in the skillet to produce steam. Bake for 30 minutes, and then turn the temperature down to 400 degrees. Continue baking until the loaf is very dark, almost charred-looking, 20 to 30 minutes mores. Do not worry about burning the loaf. It needs this much time in the oven for the interior to bake fully.
  8. Allow the bread to cool on a rack. Slice and enjoy.


break some bread,
muddy

Friday, January 15, 2010

Ricotta Bread

The holiday grind is officially over, so I've dusted off some of my baking cookbooks. I'm now chomping at the bit to bake bread.

Because many of the breads I like to make demand multiple rises, a full day is often needed to bake bread, which means I rarely bake duirng the week. However, this week a set out to find some breads to add to my weekday arsenal. I found one in Local Breads by Daniel Leader. It's a Ricotta Bread, and this bread might has a great texture. The fat in the rioctta yields a soft, velvetty crumb. Someday I hope to sit underneath a velvet painting of Elvis while eating a buttered slice of this bread, and at that moment things would come full circle for me.

Elvis has been on my mind lately.

Back to the bread.

Italian Ricotta Bread

Ingredients

  • 3/4 cup water, 70 to 78° F
  • 1/2 cup milk, 70 to 78° F
  • 1 tablespoon instant yeast
  • 3-1/4 cups unbleached all-purpose flour
    2 tablespoons unsalted butter, cut into small pieces
  • 3/4 cup whole-milk ricotta, room temperature
  • 1-1/2 teaspoons sea salt
  • 1/4 cup ice cubes

Preparation

1. MIX THE DOUGH: Pour the milk and water into the bowl of the stand mixer. Add the yeast, flour, butter, ricotta, and salt. Stir just until the dough comes together.

2. KNEAD: Using the dough hook attachment, mix the dough on medium speed (4 on the KitchenAid) until it’s very supple, smooth, and elastic, about 10 to 12 minutes.

3. FERMENT: Transfer the kneaded dough to the prepared 2 quart container. Use a piece of masking tape to mark the point at which the dough will have doubled in volume. Put the lid on top and leave to rise at room temperature (70 to 75° F) until the dough doubles and inflates into a dome, about 1 to 1-1/2 hours. It should deflate slightly when pressed.

4. SHAPE: Turn the dough out onto a lightly floured counter. Use the bench scraper to cut the dough into two equal pieces. Roll each piece around the counter, shaping into a ball. Cup your hands around the ball and move in tight circles, until the dough surface becomes taught and smooth. Place the shaped loaves smooth side up on a sheet of parchment paper, about 4 inches apart. Cover with plastic wrap.

5. PROOF: Allow the loaves to rise at room temperature (70 to 75° F) until the look puffy and have nearly doubled in size, about 1 to 1-1/2 hours. The dough should spring back slowly when you press a finger into it.

6. Preheat the oven: About 1 hour before baking, put the baking stone in the middle of the oven and the cast iron skillet on the bottom rack. Heat the oven to 400° F.

7. Bake: Put a fresh piece of parchment on the bakers peel/rimless baking sheet and dust with flour. Gently flip the rounds onto the parchment so that the bottom side is up. Slide the parchment with the loaves onto the baking stone. Pour the ice cubes into the hot skillet and close the oven. Bake until the rounds are golden, about 20 to 30 minutes.

8. COOL AND STORE: Slide the peel/rimless baking sheet until the parchment and remove the loaves from the oven. Slide onto a wire rack and allow to cool for a few minutes, then remove the parchment and allow the loaves to cool completely, about 1 hour. Store in a resealable plastic bag at room temperature. Will keep for 2 to 3 days, or freeze for up to 1 month.


bless my soul, and let the good times roll,

muddy

Tuesday, December 15, 2009

Cranberry-Walnut Bread

I often approach cooking with the enthusiasm of a boy who meets a girl, immediately falls in love, and gets that girl's name tattooed on his chest. My unbridled enthusiasm often prevents from seeing the big picture, and I often put the cart before the horse. In the end, I scratch my head and mutter, "I guess, I didn't think about that."

This was the case last we week when I started to prepare a cranberry-walnut bread. I started the bread at 4:30 on a weekday afternoon. After preparing the starter for this bread, I realized that it would take an additional 7-8 hours to finish the bread. Since I'm a guy who needs all the beauty sleep I can get, staying up to finish the bread wasn't an option. I shortened the rise times for this recipe, and fortunately the bread turned out great.

I've been making this bread for three years, and each time I make it, I'm impressed with its rustic appearance and how it's the perfect companion for a toaster.


Cranberry-Walnut Bread
(Recipe adapted from The Bread Bible by Rose Levy Beranbaum)


tramping a perpetual journey,
muddy

Tuesday, October 20, 2009

Beer Bread

This past weekend my wife and daughter traveled to Disney World, so I spent the weekend alone. I realized that I don't really like just cooking for myself. I also spent a lot of time talking to myself. A lot of my conversations, like the following, were with Mr. Crankypants:

Mr. C: What are you cooking?

ME: I'm baking a beer bread. It's a quick bread.

Mr. C: Bread shouldn't be quick. Good bread demands time, attention, kneading, proofing, and the hands of an artist. Those things build flavor, and there's nothing quick about it.

ME: Well, this bread is convenient. It also uses beer, which I think is kinda cool.

Mr. C: Convenience is the scourge of American culture. What kind of of beer did you use?

ME: Coors Light.

When he heard this, Mr. Crankypants picked up his copy of Don Quixote, grumbled something about shit and me being an idiot, and then he left the room. I didn't see him the rest of the afternoon. I must say that I was terribly lonely.

Here's the recipe I used from a book simply titled Baking by Chuck Williams. It's not a bad recipe; however, using dried chives didn't really add to the flavor of the bread. I need something with more punch.


Beer Bread

Ingredients:

  • 2 1/2 cups flour
  • 2 tablespoons sugar
  • 1 tablespoon baking powder
  • 1 1/2 teaspoons baking soda
  • 1 teaspoon salt
  • 1 table chopped fresh chives or 1 1/2 teaspoon dried
  • 1 1/2 cups beer
  • 1 cup of cheddar cheese
Preparation:

  1. Preheat the oven to 375 degree, and grease a 9-by-5-inch loaf pan.
  2. In a bowl, mix the flour, sugar, baking powder, baking soda, salt, and dill. Stir int he beer and cheese until blended.
  3. Pour and scrap the batter into the pan. Bake until a wood toothpick inserted into the center of the oaf comes out clean, about 50 minutes.
  4. Allow to cool for 10 minutes, and then turn out onto a wire rack.
  5. Enjoy

keep your skillet good and greasy,

muddy

Thursday, April 2, 2009

Biscuits

Every two years I reread my favorite book, Larry McMurtry's Lonesome Dove. There are hundreds of passages in the book I eagerly anticipate. One moment occurs early in the book when McMurtry describes Augustus McCrae's breakfast routine:
The heart of his breakfast was a plenitude of sourdough biscuits, which he cooked in a Dutch oven out in the backyard. His pot dough had been perking along happily for over ten years, and the first thing he did upon rising was check it out. The rest of the breakfast was secondary, just a matter of whacking off a few slabs of bacon and frying a panful of pullet eggs. Bolivar could generally be trusted to deal with the coffee.

Augustus cooked his biscuits outside for three reasons. One was because the house was sure to heat up well enough anyway during the day, so there was no point in building any more of a fire than was necessary for bacon and eggs. Two was because biscuits cooked in a Dutch over tasted better than stove-cooked biscuits, and three was because he liked to be outside to catch the first light. A man that depended on an indoor cookstove would miss the sunrise, and if he missed sunrise in Lonesome Dove, he would have to wait out a long stretch of heat and dust before he got to see anything so pretty.
I love this passage. I aspire to bake biscuits in a Dutch oven over an open fire, just like Gus, but since I struggle to successfully bake biscuits indoors, I don't see myself baking biscuits as the sun rises over my shoulder any time soon. I tend to overwork the dough or I add too much flour. I've decided that the key to making great biscuits is experience, something I don't have. I need to bake a few hundred batches of biscuit to acquire the intuitive nature to know when all the variables are prime for perfect biscuits.

Recently I made a biscuit topping for a Guinness Beef Pot Pie, and I learned a few keys to making good biscuits:
  1. Using a little cake flour with all-purpose flour produces a lighter fluffier biscuit. Cake flour is ground finer and contains less protein, which results in a lighter texture. As you well know, Southerners tend to bake the best biscuits, and part of this is due to the flour they use. Southern flour, like White Lily, is milled from a softer variety of wheat and is similar to cake flour.
  2. Using a food processor helped me avoid overworking the dough. I know this is cheating, but I'm OK using this crutch until I gain more confidence.
  3. Somewhere I read that when cutting biscuits a baker shouldn't twist the cutter. Doing this will affect the rise of the biscuit. It's best to press straight down and stamp them out.
I know there are a lot of biscuit recipes out there, and I plan on trying more recipes until I find the perfect one for me. For now, I'll share the recipe that helped me take that first step to being the next Augustus McCrae of biscuit making:

Biscuits


Ingredients:
  • 1 cup all-purpose flour
  • 1 cup cake flour
  • 2 teaspoons baking powder
  • 1/4 teaspoon baking soda
  • 1 teaspoon sugar
  • 1/2 teaspoon salt
  • 8 tablespoons (1 stick) cold unsalted butter, cut into 1/4-inch cubes.
  • 3/4 cup cold buttermilk, plus 1 to 2 tablespoons if needed
Preparation:
  1. Preheat the oven to 400 degrees.
  2. Pulse all of the dry ingredients in a food processor until well mixed. Add the butter and pulse until the mixture resembles coarse cornmeal. This will take about 10 pulses.
  3. Transfer the mixture to a medium bowls and add the buttermilk. Stir with a fork until the dough gathers into moist clumps. If it doesn't clump add a bit of buttermilk, until it comes together.
  4. Transfer dough to a floured work surface and form into a rough ball. Using a rolling pin, gently roll the dough out to 1/2-inch thickness. Using a 3-inch biscuit cutter and stamp out 8-12 rounds of dough.
  5. Place the biscuits on a cookie sheet and bake for 30 minutes or until golden brown.

Saturday, January 24, 2009

40-Hour Week Dinner Rolls A.K.A. Scoop-and-Bake Dinner Rolls


We love music here at The Greasy Skillet. There are days when carefully selected playlists are as essential in the kitchen as sharp knives.
We don't discriminate when it comes to music. We spin an eclectic mix of music in our kitchen.

I love songs that mention geographic locales. I trace this love back to singing Woody Guthrie's "This Land is Your Land" back in my elementary school days. When I hear a song that mentions a dot or squiggle on a map, I start thinking about the possibilities the road has to offer. Of course, some of those possibilities involve food.

However, I've noticed songwriters often ignore the state of Kansas. They seem to favor those Southern states or California, and if I had a dollar for every song that mentioned Texas, I could retire and blog full time.

I have encountered a few songs that mention the Great State of Kansas. Over the next few weeks I will spotlight some of those songs, and since this is a food blog, I'll throw in a recipe to accompany each song.

When I told Mr. Crankypants about this feature he actually smiled and seemed excited - something I rarely see from him. When I revealed the song I would use to kickoff this feature, he threw a fit and screamed, "Nooooo. You can't feature that song. It's crap. It's schmaltzy drivel. It has slick, over-produced sound that sounds canned. In fact, it's the equivalent of canned mushrooms. You wouldn't use canned mushrooms in a recipe."

I then explained to him that this song was part of my youth, and here at the The Greasy Skillet I strive to be honest, even if it is a bit ugly. I told him that a people shouldn't have to defend their musical tastes. I also told him that I don't have a problem occasionally using canned mushrooms when I cook. To conclude my argument, I simply informed him that this was my blog and I would do whatever the heck I wanted to do and schmalty drivel is redundant.

He simply grimaced through my whole explanation.

Today's featured song is "40-Hour Week" by Alabama. I have fond memories of this song. When I was in middle school, I'd spend the weekend with my cousin who lived in Quenemo, Kansas. In the afternoons, we take a pocketfull of quarters and head down to the travern, where we'd waste away the afternoon shooting pool, playing Galaga, and eating junk food. We'd also pump quarters into the jukebox. Between cuts from Def Leppard and Pat Benetar, we'd play some Alabama

The song "40-Hour Week" praises the hard workin' folk across American. It's just one of many country songs that explores this theme, but at one time I really loved the song because it was the first song that mentioned my home state.
There are people in this country who work hard every day
Not for fame or fortune do they strive
But the fruits of their labor are worth more than their pay
And it's time a few of them were recognized

Hello Detroit auto workers, let me thank you for your time
You work a forty hour week for a livin', just to send it on down the line
Hello Pittsburgh steel mill workers, let me thank you for your time
You work a forty hour week for a livin', just to send it on down the line

This is for the one who swings the hammer, driving home the nail
Or the one behind the counter, ringing up the sale
Or the one who fights the fires, the one who brings the mail
For everyone who works behind the scenes

You can see them every morning in the factories and the fields
In the city streets and the quiet country towns
Working together like spokes inside a wheel
They keep this country turning around

Hello Kansas wheat field farmer, let me thank you for your time
You work a forty hour week for a livin', just to send it on down the line
Hello West Virginia coal miner, let me thank you for your time
You work a forty hour week for a livin', just to send it on down the line

This is for the one who drives the big rig, up and down the road
Or the one out in the warehouse, bringing in the load
Or the waitress, the mechanic, the policeman on patrol
For everyone who works behind the scenes

With a spirit you can't replace with no machine
Hello America let me thank you for your time

You wont' find this song on my Ipod, but if I heard "40-Hour Week" blaring from a bar jukebox, I'd hoist a beer and heartily sing that line about Kansas wheat field farmers.

Here's a recipe for those who people who work hard each day and find it difficult to fit a little baking into the schedule:

Scoop-and-Bake Dinner Rolls


Ingredients:
  • 2 1/4 cups all-purpose flour
  • 14/ cup sugar
  • 1 teaspoon salt
  • 1 envelope (2 1/4 teaspoons) instant yeast
  • 1 cup warm water
  • 6 tablespoons unsalted butter, softened
  • 1 large egg
Preparation:
  1. Grease a twelve-cup muffin tin.
  2. Whisk 1 1/4 cups of the flour, salt, sugar, and yeast in a large bowl. Whisk in the butter, egg, and water until it is smooth. Add the remaining 1 cup of flour and mix until it's combined. Cover the bowl with plastic wrap and place in a warm place until the batter has doubled in size. This will take about 30 minutes.
  3. Preheat the oven to 375 degrees. Punch the dough down. Scoop the batter evenly into the muffin cups. I use a large ice cream scoop. Cover the muffin cups with greased plastic wrap and let rise at room temperature until the batter reaches the rims of the muffin cups, about 15 minutes.
  4. Remove the plastic wrap and bake the rolls until golden, 14 to 18 minutes. Allow to cool for about 10-15 minutes before removing.
  5. Serve

What's your favorite song that mentions a geographic locale?

May your tank always be full,
muddywaters

Next week Josh Ritter's "Lawrence, KS" will be in the spotlight.

Friday, January 2, 2009

Alpine Bread

Once upon a time, there were just three commercial television networks and most families owned only one television. During this fabled time, it was common for a family to gather around the television and watch a program together. It was also common for programs to build to a climatic cliffhanger, and when viewers were at the edges of their seats, the action would freeze and the dreaded words "To Be Continued" would flash across the screen. Collective groans would fill living rooms, and then families would discuss what might happen next week. I have fond memories of such nonsense. My favorite To-Be-Continued moment might be from the TV show Happy Days. I'll never forget a leather-jacketed Fonzie on water skis as he approached a ramp to jump a blood thirsty shark. It was high drama for a seven-year-old muddywaters.

Nostalgia. Those were the days.

A few weeks ago I provided readers with a toned-down version of a Fonzie-jumps-the-shark moment - minus the absurdity, I think - when I mentioned my quest to cultivate a rye sourdough culture and bake brotchen. I left readers hanging, but today I'm here to give you an update on my jumping of the shark. The following is a brief recap of what happened:
  1. Due to a low room temperature, my sourdough culture struggled to come to life.
  2. My culture eventually came to life and possessed a nice sour tang.
  3. I used my culture in my first attempt at making the recipe in this post.
  4. The recipe turned out great, but I couldn't detect that nice sour tang in my final product.
  5. Therefore, I decided to scrap the sourdough, and use a starter that was more practical.
While I didn't end up with a brotchen that measured up to Wheatfields Bakery, I ended up with a bread that is more practical for my busy schedule, and it's quite tasty. It's a hearty companion for a bowl of soup.

Alpine Bread
Adapted from Daniel Leader's Local Breads


Poolish Ingredients
  • 1/4 teaspoon instant yeast
  • 1/4 cup of rye flour
  • 1/4 cup of water
Ingredients for Dough
  • Poolish from above
  • 1/3 cup rolled oats
  • 1/3 cup sunflower seeds
  • 1/3 cup flax seeds
  • 1/4 cup wheat berries
  • 2 1/4 cups water
  • 1 teaspoon instant yeast
  • 2 cups bread flour
  • 1 cup whole-wheat flour
  • 2 teaspoons kosher salt
Preparation:
  • PREPARING THE POOLISH AND SOAKING THE GRAINS: 24 hours before you plan to bake, mix the poolish ingredients and allow it to rise at room temperature. The poolish won't rise a lot, but it will become bubbly and spongy. Pour the rolled oats and seeds into a small bowl and cover them with 3/4 cup water. Soak them overnight, uncovered, so they plump and soften.
  • MIXING THE DOUGH: Pour the remaining 1 1/2 cups of water into a large mixing bowl. Stir in the yeast, bread flour, soaked oats and seeds, and salt with a spatula or wooden spoon. Scrape the poolish into the dough, and then with your spoon or spatula work the poolish into the dough.
  • KNEAD THE DOUGH: Use the dough hook and mix the dough on medium-low speed (3 on a KitchenAid mixer) for 8 minutes. Turn off the mix and scrape the hook and the sides of the bowl. Drape a piece of plastic wrap over the dough and allow it to rest for 10 minutes. Turn the mixer back on to medium-low and knead the dough until strands of gluten develop and it clears the side of the mixing bowl. During the 2nd round of kneading, you might need to add a tablespoon or two of extra flour, so that the dough isn't so sticky.

  • THE RISE: Transfer the dough to a lightly oil, 2-quart container. Cover and let it rise at room temperature until it doubles, which should take 2 to 2 1/2 hours. When you press your fingertip into the dough, your fingerprint will spring back slowly.


  • PREPARE THE OVEN: About 1 hour before baking, place a baking stone on the middle rack of the oven and a cast-iron skillet on the lower rack. Heat the over to 450 degrees.
  • SHAPE THE LOAF: On a floured surface, shape the bread into a boule, which is a round loaf. For instructions, visit this page at FoodTV.
  • PROOF THE LOAF: Let the loaf rise at room temperature for about 45-60 minutes. The loaf should look puffy. When you press your fingertip into the dough, your fingerprint will spring back slowly.
  • BAKE THE LOAF: Slide the loaf, still on the parchment, onto the baking stone. Place 3/4 cup of ice cubes in the skillet to produce steam. Bake until the loaf is nicely browned, 25 to 30 minutes.
  • COOL AND STORE: Cool the loaf for about 30 minutes. Store cooled loaf in a brown paper bag. Reheat in a 350-degree oven for 7 minutes to recrisp the crust. For longer storage, freeze in resealable plastic bags for up to 1 month.
Next time I think I'll shape this bread into some baguettes, and I'll do it on water skis while wearing a leather jacket. I'll keep you posted.

Sit on it,
muddywaters

Monday, December 15, 2008

Ciabatta

Long before I developed an addiction to brötchen, ciabatta was my bread of choice. With its elongated, dimpled, grotesque appearance, ciabatta is the Ernest Borgnine of the bread world. However, what it lacks in appearance, it makes up for in taste. Ciabatta possesses a light, airy interior with Swiss cheese like holes that I love.


I worked hard to learn this bread. With a keen sense of anticipation, week after week I'd slice into my loaves, and week after week, I encountered a dense crumb. I failed with this bread because I applied the bread baking paradigm of my youth to this bread. I kept insisting on creating a firm dough that could be kneaded and shaped by hand. However, ciabatta requires a wet dough that demands a mixer to adequately knead it.

I learned this when I read the following excerpt from Daniel Leader's Local Breads:

Water, and lots of it, is the key ingredient in ciabatta. Water hydrates the starches that gelatinize and swell into glossy air pockets that distinguish this bread from other Italian loaves. Water also makes the dough extremely sticky and more challenging to handle than traditional bread dough, so use a mixer instead of kneading by hand. The dough takes longer to rise, which is why the fermentation time for this bread is longer than for any other bread . . . It's during the slow rise that ciabatta develops its porous structure. Light steam gives the bread its characteristic soft crust, which makes ciabatta so perfect for sandwiches.
(This is a picture of the dough after it's been kneaded)

Once I embraced this, baking ciabatta was a breeze. Just remember the following when making ciabatta:
  • It's a wet dough that demands a mixer to effectively knead it.
  • Give it adequate time to proof.
  • Before you place the bread in the oven, you need to create some steam, so that the loaves will spring. This step is crucial.
  • Don't worry about getting the bread perfectly shaped. Embrace its rustic appearance.
Ciabatta
Adapted from
Daniel Leader's Local Breads
(The crumb of the bread in this picture has a pale appearance because I just pulled the bread from my freezer,; therefore it's a bit a bit frozen)

Biga Ingredients (A biga is similar to a sourdough starter; however, it doesn't contain as much water)
  • 1/3 cup of water
  • 1/2 teaspoon instant yeast
  • 2/3 cup unbleached bread flour
Preparation:
  1. Nine to 17 hours before you want to bake, prepare the biga. Simply pour the water into a small mixing bowl, and with a rubber spatula stir in the yeast and flour until a stiff dough forms.
  2. Dust the counter with flour and scrape out the dough. Knead the dough for a couple of minutes just to work in all the flour and get it fairly smooth. At this point you should have about a plum-size ball of dough.
  3. Lightly oil the mixing bowl, and place the biga in the bowl. Cover the bowl with plastic wrap, and leave at room temperature for 1 hour or so. Then refrigerate it for at least 8 and up to 16 hours. The biga will double and become somewhat bubbly.

Bread Dough Ingredients
  • Biga from the above recipe
  • 1 3/4 cups water
  • 2 teaspoons instant yeast
  • 3 1/4 cups unbleached bread flour
  • 1 1/2 teaspoons kosher salt
Preparation:
  1. Remove the biga from the refrigerator, and scrape it into the mixing bowl. Pour the water over the big and stir it with a spatula to soften it and break it into clumps. Stir in the yeast, flour, and salt until a dough forms.
  2. With the dough hook, mix the dough on medium-high speed (8 on a KitchenAid mixer) for 13 to 15 minutes. Keep an eye on the mixer because it might shimmy off the counter. At first the dough will be very soupy and it will not clear the side of the bowl, but gradually the dough will develop beautiful strands of gluten and begin to climb up the dough hook. Periodically stop the machine and scrape down the hook and the sides of the bowl with a rubber spatula. After 13-15 minutes, turn the machine to high speed and knead until the dough becomes more coherent, clears the sides of the bowl, and collects around the hook. This should take about 2 to 3 minutes, and when you're done, the dough will glisten. Think: Ashley Judd in the movie A Time to Kill, or if you prefer, the forehead of a 1970's Vegas Elvis wearing a jewel-encrusted jumpsuit. The dough will look creamy and will be very elastic.
  3. Transfer the dough to a lightly oiled, clear 2-quart container and cover it with plastic wrap. Let the dough rise at room temperature until it triples in size. This will take 3 to 4 hours. The dough will be lively, bubbly, and you'll be able to pull away long, stretchy strands.
  4. Cover a baker's peel or rimless baking sheet with parchment paper, and dust the paper with flour. Uncover the dough and turn it out onto a heavily floured countertop. With a bench scraper or pizza cutter, cut the dough into 2 equal piece (19.6 ounces each). Generously dust your hands with flour because this will prevent the dough from sticking to your hands. Pick up one piece of dough, holding one end in each hand. In one fluid motion, lift and stretch the dough and place it on one half the parchment paper. You'll have a rectangle measuring about 11 inches by 4 inches. Repeat with the other piece.
  5. Take your fingertips and gently dimple the surface of the bread. Drape the loaves with a tea towel or plastic wrap.Let the loaves rise at room temperature until you see bubbles under the surface of the bread. This will take 45 - 60 minutes.
  6. About 1 hour before baking, place a baking stone on the middle oven rack and place a cast-iron skillet or cake pan on the lower rack. Heat the oven to 475 degrees.
  7. Uncover the loaves. Slide the loaves, still on the parchment paper, onto the baking stone. Place 1/2 cup of ice cubes in the skillet to produce steam. Bake until the loaves are light golden crusted, 25 to 35 minutes.
  8. Remove the bread from the oven, and allow the loaves to cool on a wire rack.


A Twist: Ciabatta Rolls

To make this recipe into rolls, pour the dough onto a flour-dusted counter, and gently shape it into a 10-by-12-inch rectangle. Dust the top of the dough with flour. Using a pizza wheel, cut the rectangle lengthwise into 2-inch-wide strips. Cut each strip into 3-inch pieces. You should have 20 pieces of dough. Move the dough to a parchment-covered baking sheet or peel. Let the dough pieces rest until they rise and resemble little pillows. This should take 45 - 60 minutes. Bake at 475 degrees until light golden brown, about 20 minutes. I tried this once, but I lack the grace to skillfully and patiently work with 20 pieces of dough. I ended up with a mess that could never be considered rustic.

Friday, December 12, 2008

Confession of a Culinary Snuggle Bear

I'm considering sleeping with my rye sourdough culture. No, I'm not someone who has a fetish for Saccharomyces cerevisiae. You see, I'm struggling to bring my culture to life. I'm into day #5, and my starter remains a lifeless glob resembling brick mortar. There are no beautiful strands of gluten. No rising. No air bubbles. Just a sour scent.

I think, my sourdough culture's lack of life can be attributed to the fact that my furnace themostat is usually set at 65 degrees. According to the recipe I'm using, the culture should rest in an environment where the temperature is between 70 and 75 degrees. After day #6, the recipe recommends a balmy 80-85 degree temperature.

The inside of our home rarely reaches these temeperatures, so I'm contemplating sleeping with my sourdough culture. I'm a bear of a man who generates a lot of body heat when I'm nestled underneath our down comforter and flannel sheets.

I've read that grizzled mining camp cooks often snuggled with their pirzed crocks of sourdough starters when evening temperatures dipped. I'm willing to do the same for my art, but I need to consider one thing: Is sleeping with a sourdough culture grounds for divorce?

Maybe I should just buy a little papoose for my sourdough starter, and I could cradle it next to my body all day. No one would stare; would they?

I'm not a well man.

Dressing sharp, but feelin' dull,
muddywaters

Wednesday, December 10, 2008

I'm a Brötchen Addict

Hi! My name is muddywaters and I'm addicted to Brötchen, a German roll traditionally served at breakfast. I'm in love with a version baked by Wheatfield's Bakery, which fortunately resides in my hometown. If I was short on cash, this roll would have me contemplating pawning my KitchenAid mixer, so I could get satiate my Brötchen fix.

I find its slightly blistered, caramelized crust appealing. Its earthy fragrance conjures visions of farmers harvesting wheat.

When I tear open a roll and view its whole-grained flecked interior, I always contemplate the ingredients in this Brötchen. Is this something I could bake? I see flax seeds. Is it a whole wheat flour they use or a rye flour or a combination? I detect the scent and flavor of sourdough. How do I make a sourdough?


Are those wheat berries or pearls of barley? I need to learn to bake Brötchen.

Unfortunately, after scouring the internet, I've found no recipes that resemble the Brötchen at Wheatfields. Finally, in Daniel Leader's book Local Breads: Sourdough and Whole-Grain Recipes from Europe's Best Artisan Bakers I encountered a recipe that might work.

As I write this entry, I'm attempting to cultivate a rye sourdough culture, which will be the base for my Brötchen. I'm into day number four of a ten-day process, and so far I detect no signs of life. I'll keep you posted on my progress.

take care,
muddywaters
PS:

I found a 1968 Time magazine article titled "Brotchen from Heaven." The article explained that West Germans were forced to eat day-old Brötchen because of a law prohibiting commercial baking between 9:00 pm and 4:00 am. The article went on to report a recent agreement made with East Germany to import over 60,000 Brotchen a day to West Germans in Berlin. Needless to say, the West Germans were thrilled. When food can bypass the Iron Curtain, you know that food is more than food.

Wednesday, November 12, 2008

The Cheese of Space and Time: Cranberry-Orange Spread

A long time ago, I lived in Lincolnville, Kansas, where I taught at Centre High School. I loved living there, but it had a few drawbacks:
  1. Livestock outnumbered young, single females.
  2. On the few occasions I shopped at the local liquor store, I felt like the entire community had me under surveillance.
  3. The few businesses in town closed at 8:00 or earlier in the evening, so if I needed to purchase anything essential, I had to drive 45 miles to the nearest store.

The last fact challenged this food-loving soul. If I developed a craving during the night, I just had to go to bed and sleep through it. This often resulted in Daliesque* dreams comprised of melting cheese and phallic vegetables. Hunger-induced dreams aren't pretty.

One time sleep couldn't stifle a 1:00 a.m., chocolate craving. My bachelor cupboards were bare, except for a box of brownie mix, so I mixed it up - minus the eggs - and ate the batter with a spoon. It's best to draw the shades if you indulge in such culinary perversions.

Last night when I scraped the mixing bowl and sampled a cranberry-orange spread I had just prepared, I thought about my desperate attempt to satiate my craving so long ago. For a brief second, I felt the need to be absolved of this culinary sin. This feeling quickly passed and I mustered the gumption to polish off the mixture of cream cheese, butter, and sugar remaining in the bowl.

Here's the recipe for the Cranberry Orange Spread adapted from Carole Walter's Great Coffee Cakes, Sticky Buns, Muffins & More, which contains a whole chapter full of recipes for spreads, glazes, icing, and streusels.

Cranberry Orange Spread


Ingredients:
  • 1/4 cup orange juice
  • 2 tablespoons orange-flavored liqueur
  • 6 tablespoons dried cranberries plumped
  • 1/2 cup unsalted butter, softened
  • 6 ounces cream cheese softened
  • 1/4 cup sifted powdered sugar
  • 1 teaspoon freshly grated orange zest
  • pinch of salt
Preparation:

  1. Combine the orange juice and orange liqueur in a small saucepan. Warm liquid over low heat, then add cranberries. Allow them to steep for 5 minutes. Drain the cranberries and pat them dry with paper towels.
  2. Place the cranberries in a food processor fitted with a steel blade. Pulse until finely chopped.
  3. Add the butter, powdered sugar, cream cheese, zest, and salt. Process until everything is combined. Remove the mixture and place in a small bowl. Refrigerate
  4. When you're ready to use the spread, allow it to soften before serving.


**As many of you know, artist Salvador Dali's most famous work is The Persistence of Memory. After reading The History of Modern Art by H. H. Arnason, I learned that Dali painted this work one night after dinner, when, after all the guests were gone, he contemplated the leftover Camembert cheese melting on the table. According to Dali the painting is "nothing more than the soft, extravagant, solitary, paranoiac-critical Camembert cheese of space and time." I don't know what the hell that means, but when you're Salvador Dali, you can spout such gibberish and it's cool. Here's what I do know:

Once again, food is more than food; it has the power to inspire legendary artists.

lick the bowl clean,
muddywaters

Tuesday, October 28, 2008

Apple Bread

You won't find this bread gracing the cover of Bon Appetit. Its gnarled, warped appearance might make some grimace.


I like to think it possesses a rustic appearance. I like the bread. Tucked within are a few surprises.


Can you see them? Autumn's great bounty -- apples!


I introduced Mr. Apple Bread to Mr. Toaster.


They hit it off, and I think, they'll be lifelong friends.

Apple Bread

Ingredients:
  • 1 cup warm water
  • 1 tablespoon instant yeast
  • 1/4 cup unsalted butter, melted
  • 1/2 teaspoon pure vanilla extract
  • 1 egg
  • 2 1/2 tablespoon of granulated sugar
  • 3/4 teaspoon salt
  • 1/8 teaspoon ground cinnamon
  • 3 cups of flour
Filling
  • 2 large apples peeled, cored and diced. If you want to use 3 apples, go for it.
  • 3/8 cup of granulated sugar
  • 1 teaspoon ground cinnamon
  • cinnamon sugar for dusting
Preparation:
  1. Combine yeast and water in the mixing bowl.
  2. Stir in the butter, vanilla, eggs, sugar, salt, cinnamon, and the flour. Then mix to make a soft, shaggy mass.
  3. Knead with the dough hook on the lowest speed of the mixer for 8 to 10 minutes. The dough won't really come together. However, in the next step it will become a soft, elastic dough.
  4. Turn the dough out onto a lightly floured surface and sprinkle the top with flour. Now form it into a ball. The dough is of the softest I've worked with, and when I feel it, it reminds me of a running my fingers over a velvet portrait of Elvis. Place the dough in a greased bowl, and cover it with plastic wrap. Let it rise for 30-45 minutes, or until almost doubled.
  5. Gently deflate the dough. Spray the top with cooking spray. Cover the dough and let it rest for 20 minutes.
  6. While the dough is resting, make the filling. In a large bowl, toss the apples with the sugar and cinnamon.
  7. Now here's the difficult part, a step I haven't quite mastered: You need to evenly distribute the apples in the dough. On a lightly floured surface, roll the dough into a 10-inch circle. Press half the apple mixture into the dough. Now fold the dough over to completely cover the apples. Some of the apples might pop out, which is fine; just press them back into the dough. Flatten the dough with a rolling pin to distribute the apples. Press the remaining filling into the top of the dough. Fold the dough over again and pinch the edges to seal. Some apples may puncture the loaf. Don't fret; this is fine. Shape the dough into a fat oblong log, so that it fits into a 9 x 5-inch loaf pan. If you want to go with a little larger pan, that's fine, but I wouldn't go smaller.
  8. Spray the pan with cooking spray, and then place the bread into the pan. Spray the top of the loaf with cooking spray and sprinkle with cinnamon sugar. Let the bread rise for 30 to 50 minutes, or until puffy.
  9. Preheat over to 350 degrees. Bake with 35 to 45 minutes, or until well browned. Allow the bread to cook in the pan for 15 to 20 minutes before unmolding.
  10. Enjoy!
take care,
muddywaters

Sunday, September 28, 2008

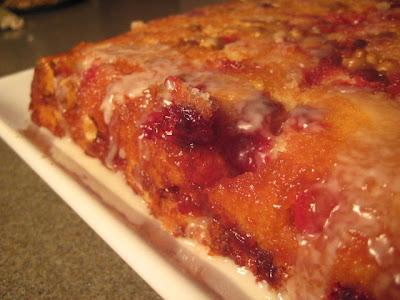
Cranberry-Upside-Down Coffee Cake

It's Sunday evening. Since I'm trying to enjoy every last drop of this beautiful weekend, I'll dispense with the words for this entry. I'll just give you the wonderful recipe for the coffee cake I prepared for breakfast this morning:


Cranberry-Upside-Down Coffee Cake

Cake:
  • Cooking spray
  • 1 tablespoon all-purpose flour
  • 1 1/2 cups fresh cranberries
  • 1/4 cup chopped walnuts or pecans
  • 1 teaspoon grated orange rind
  • 1/2 cup butter, softened and divided
  • 1/2 cup packed dark brown sugar
  • 2 tablespoons fresh orange juice
  • 1/4 teaspoon ground cinnamon
  • 1 1/2 cups all-purpose flour (about 6 3/4 ounces)
  • 1 teaspoon baking powder
  • 1/2 teaspoon salt
  • 1 cup granulated sugar
  • 1 teaspoon vanilla
  • 1 large egg
  • 1/2 cup buttermilk
Glaze:
  • 1 cup powdered sugar
  • 1 teaspoon half and half
  • 2 tablespoons fresh orange juice
Preparation:
  1. Preheat oven to 350°.
  2. To prepare cake, coat a 9-inch square baking pan with cooking spray; dust with 1 tablespoon flour. Combine cranberries, walnuts, and rind in a bowl. Melt 2 tablespoons butter in a small saucepan over medium heat. Stir in brown sugar, 2 tablespoons juice, and cinnamon; cook 3 minutes, stirring constantly.
  3. Pour brown sugar mixture into prepared pan. Sprinkle cranberry mixture evenly over brown sugar mixture.
  4. Lightly spoon 1 1/2 cups flour into dry measuring cups; level with a knife. Combine flour, baking powder, and salt in a bowl, stirring well with a whisk. Place granulated sugar and remaining 6 tablespoons butter in a large bowl; beat with a mixer at medium speed until well blended. Add vanilla and egg; beat well. Add flour mixture and buttermilk alternately to granulated sugar mixture, beginning and ending with flour mixture. Spoon batter over cranberry mixture.
  5. Bake at 350° for 40 minutes or until a wooden pick inserted in center comes out clean. Cool in pan 5 minutes on a wire rack; run a knife around outside edges. Invert cake onto a plate; cool.
  6. To prepare glaze, combine powdered sugar and remaining ingredients in a small bowl, stirring until smooth. Drizzle over cake. Cut cake into squares.

Enjoy,
muddywaters

Saturday, September 20, 2008

Pizza Bianca Alla Romana


Lately dinner at our house has been like a scene out of Sergio Leone western, minus the guns and the Ennio Morricone soundtrack. Night after night our daughter stubbornly refuses to eat one or two items on her plate, which leads to a standoff between her and her equally stubborn parents. Last night she refused to eat a biscuit.

My wife and I don't cave easily. I'm usually the good cop, and my wife plays the role of bad cop with a flair and swagger that would make Robert De Niro jealous. We firmly draw a line in the sand, we never back down, and regardless of how cute, intelligent, and charming our four-year-old daughter might be, we refuse to negotiate. We play hardball, so it's a tough world for a Miss Picky Eater. I should add that we always win.

I'm sure I'm exaggerating a bit. Our daughter eats and enjoys most fruits and vegetables. She's stubborn and picky when it comes to meats or new recipes, which is a real problem in a household where I'm constantly trying new dishes. Some of her "pickiness" is downright perplexing:

Exhibit A:

She's even picky when it comes to pizza, a perennial kid's favorite. However, she prefers her pizza sans sauce and with cheese as the only topping. Then she usually polish off her nubs of crust with a bit of honey. This is the only way she'll eat pizza.

Now this isn't a major problem in my household. I always have pizza dough on hand, and pizzas are made to suit the tastes of each family member.

However, I'm not always satisfied making one type of pizza, so this summer I tried another type of pizza dough to experiment with a slightly different crust. My daughter wasn't a fan, but this recipe was a hit with me. I love how this crusty is crunch while possessing a springy, light texture. This would be a great complement to your next pasta dinner.

Now the dough is an extremely wet, and there will be moments in the process where you'll question if everything will ever come together. Have faith. Everything will work out, and you'll be rewarded with a wonderful bread.


Pizza Bianca Alla Romana

Ingredients:

Dough
  • 1 3/4 cups of water
  • 1 teaspoon instant yeast
  • 3 1/4 cups unbleached, bread flour
  • 1 1/2 teaspoons kosher salt

Topping
  • 1/3 cup extra-virgin olive oil
  • 1 1/2 teaspoon kosher salt
  • 1/4 cup chopped fresh rosemary

Directions:
  1. Pour the water into the bowl of a stand mixer. Add the yeast, flour, and salt. Then stir to blend into a dough.
  2. With the dough hook, mix the dough on medium-high speed (8 on a KitchenAid Mixer) for 15 to 17 minutes. Since at this speed the mixer has a tendency to "shimmy" off the counter, be sure you supervise the mixer during this process. The dough won't clear the sides of the bowl and will gradually climb up the dough hook. Occasionally stop the mixer and scrape down the hook and the sides of the bowl with a rubber spatula. You'll gradually see strands of beautiful gluten start to appear.
  3. After the first 15-17 minutes, turn the mixer to high speed and knead until the dough comes together, clears the sides of the bowl, and collects around the hook. This should take 2-3 minutes. The dough will be glistening and very elastic. At this point check the dough and make sure the gluten is developed by pulling off a golf ball-sized piece. Stretch it. If it tears, knead for 1-2 minutes more and test again. You should be able to stretch the dough into an opaque windowpane that doesn't tear.
  4. Transfer the dough to a lightly oiled bowl and cover. At room temperature let the dough rise until it triples in volume. This should take 3 1/2 to 4 hours.
  5. Before baking, place a baking stone on the middle rack and heat the oven to 500 degrees.
  6. Coat your counter or pastry mat with flour. Uncover the dough and scrape it onto the counter. Lightly but thoroughly dust the top of the dough with flour. With a bench scraper, cut the dough into two equal pieces. Drape with plastic wrap and let them rest for 10 minutes.
  7. Now measure some parchment paper to fit the size of your baking stone. Spray the paper with cooking spray or lightly brush with oil. Place one of dough halves on the paper. Now gradually stretch your dough to fill the parchment paper. This takes a lot of patience and skill, two qualities I sometimes lack. I usually shape the dough by lightly stretching one corner of dough at a time. I stretch and stretch and stretch. This elastic dough will test your patience. Just take your time and take occasional, short breaks to let the dough rest. You'll gradually shape the dough.

8. Brush dough with olive oil. Sprinkle with salt and rosemary.
9. Place the parchment and dough on a peel. Slide into the oven.
10. Bake for until 12-15 minutes or until golden brown.
11. Enjoy.

Saturday, September 13, 2008

Cinnamon Bun Bread

With Autumn whispering passionate cinnamon-scented promises in my ear, I've been dreaming of snug quilts, simmering soups, and of course, cinnamon rolls. The problem with a cinnamon roll craving is that it takes time to make the rolls. Now I enjoy the process of making rolls, but sometimes I just want my craving satiated without any hassle.

Last week I stumbled upon a recipe at Baking Bites for Cinnamon Bun Bread. It's an easy recipe they adapted from a package of rapid rise yeast, and it's the perfect proxy for cinnamon rolls.

Cinnamon Bun Bread

Ingredients:

Bread:

  • 1 1/2 cups all purpose flour
  • 1/3 cup sugar
  • 1/4 tsp salt
  • 4 tsp yeast
  • 2/3 cup warm milk (100-110F; low fat is fine)
  • 3 tbsp vegetable oil
  • 1/2 tsp vanilla extract
  • 1 large egg
Filling/Topping
  • 3 tbsp butter, room temperature
  • 3/4 cup brown sugar
  • 1 tsp ground cinnamon
Icing
  • 1 cup powdered sugar
  • 1-2 tbsp milk or cream

Directions:

  1. Grease an 8×8-inch square baking pan.
  2. In a large bowl, combine flour, sugar and salt. Dissolve the yeast in a measuring cup filled with the warmed milk, then stir milk mixture, vegetable oil, vanilla extract and egg into the flour mixture. Mix well, until very smooth. Pour into prepared pan and let rest for 15 minutes.
  3. While the dough rests, mix together butter, brown sugar, and cinnamon in a small bowl using a fork until all the butter and sugar mixture is crumbly. Sprinkle evenly on top of rested dough and gently fold some of the mixture into the dough.
  4. Place pan into a cold oven, then set the oven temperature to 350F.
  5. Bake for about 30 minutes, until bread is lightly browned at the edges and the sugar mixture is bubbling.
  6. Cool for at least 30 minutes before whisking the powdered sugar and milk together to form an icing and drizzling it onto the bread.

(A picture of the bread before being drizzled with icing. The corners contain nuggets of caramelly goodness.)

Serve warm. Leftovers can be gently reheated in the microwave.

Serves 9.

Enjoy,

muddywaters